
|
|
|||||||
 |
|
|
Thread Tools | Search this Thread | Display Modes |
 8th March 2008, 12:27 AM
|
#1 |
|
Member
Join Date: Mar 2005
Location: USA Georgia
Posts: 1,599
|
Recent acquisition and one of my favorite pieces. A seven wave blade 20 3/4 inches long showing twisted lamination on the center and bounded by twisted wire of gold & silver.
The asang-asang (metal band on the guard) is made of swasa, The grip area of the handle has a traditional cord wrap lacquered black (recent replacement, but traditional style) and a swasa ferrule with dark patina. Ivory Kakatua / jungayyan pommel has a honey color. Very unusual to find these rare delicate pommels undamaged. Dark hardwood scabbard with silver panels on the top section showing some floral designs. Another unusual feature is these silver panels are on BOTH sides. Usually only on one side. The lower part of the scabbard has 3 silver bands with similar designs as the upper panels. Sulu late 1800. 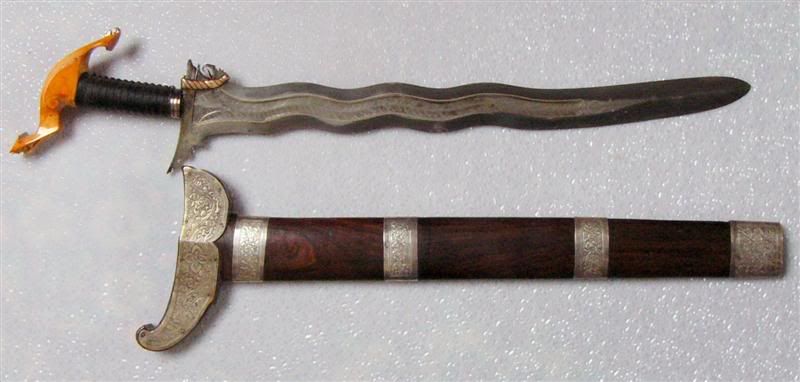 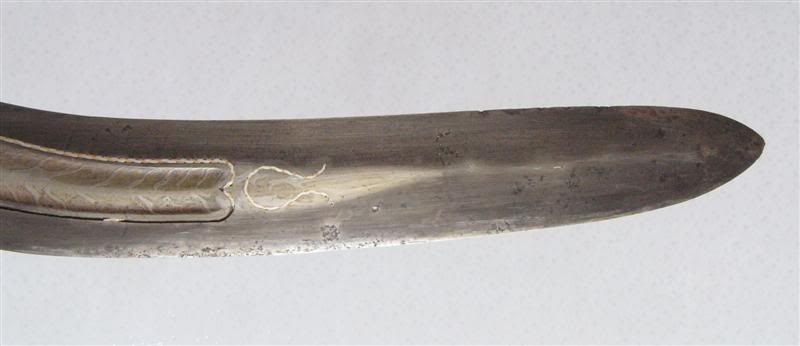 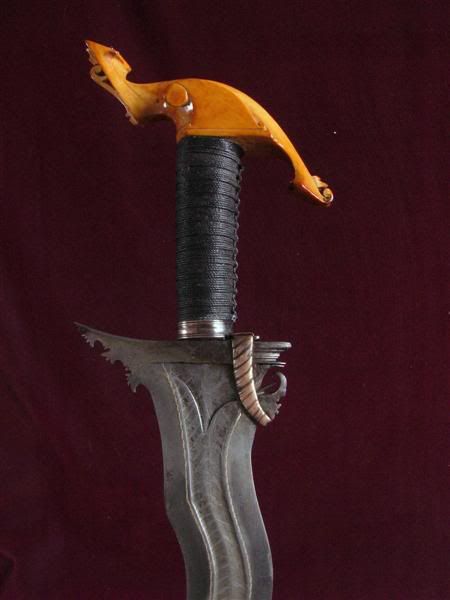 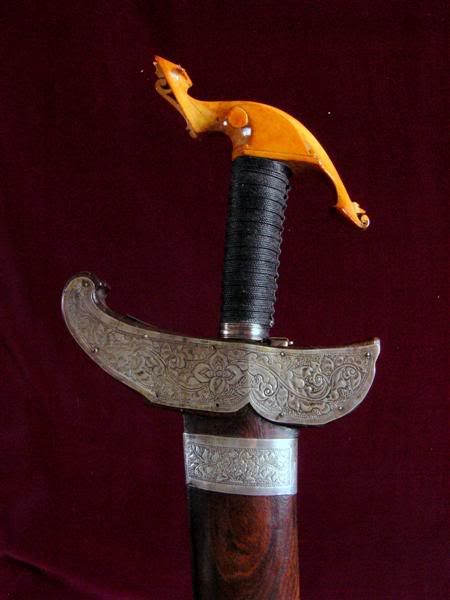 And the panel on the other side 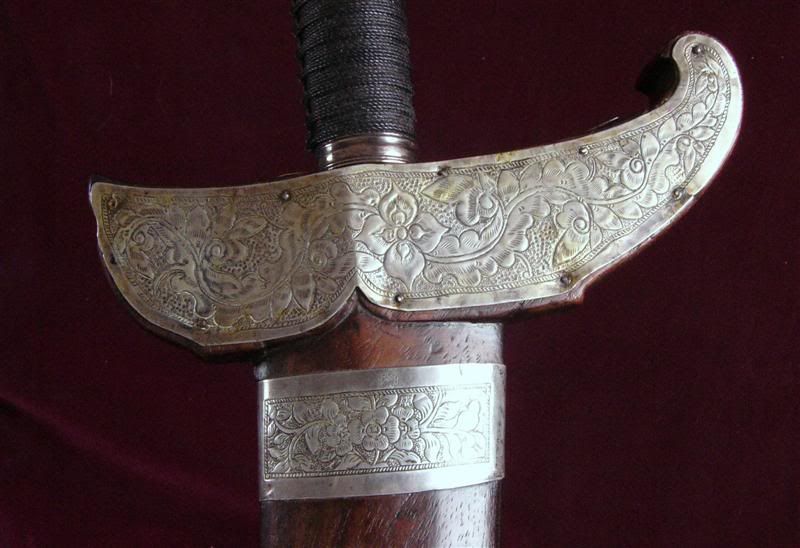 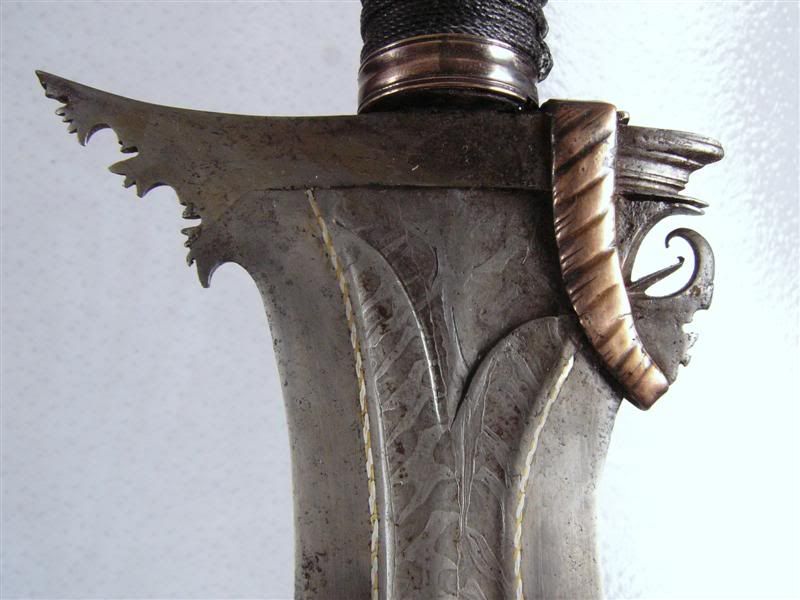 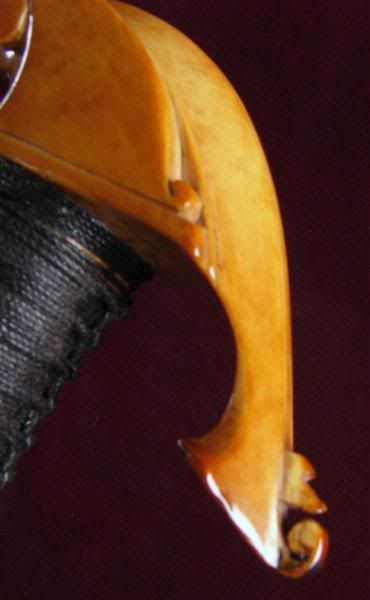 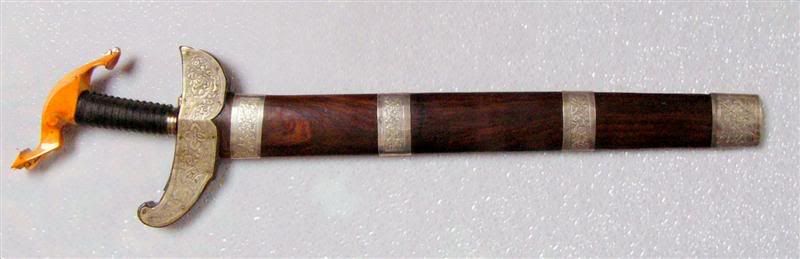
Last edited by Bill Marsh; 8th March 2008 at 01:28 AM. |

|

|
|
8th March 2008, 12:48 AM
|
#2 |
|
(deceased)
Join Date: Feb 2005
Location: Centerville, Kansas
Posts: 2,196
|
Bill, Please post pictures.
|
|
|
|
|
8th March 2008, 01:18 AM
|
#3 | |
|
Member
Join Date: Mar 2005
Location: USA Georgia
Posts: 1,599
|
Quote:
 Sorry, got interrupted. Give me a minute. Ok. Last edited by Bill Marsh; 8th March 2008 at 01:28 AM. |
|
|
|
|
|
8th March 2008, 10:15 AM
|
#4 |
|
Member
Join Date: Dec 2004
Location: Kernersville, NC, USA
Posts: 793
|
Simply wonderful.
Steve |
|
|
|
|
8th March 2008, 10:24 AM
|
#5 |
|
Member
Join Date: Dec 2004
Location: Italia
Posts: 1,243
|
When a man is so lucky to see something wonderful like this piece is, words are useless

|
|
|
|
|
8th March 2008, 10:30 AM
|
#6 | |
|
Member
Join Date: Mar 2005
Location: USA Georgia
Posts: 1,599
|
Quote:
|
|
|
|
|
|
8th March 2008, 11:57 AM
|
#7 |
|
Member
Join Date: Jan 2006
Location: Kent
Posts: 2,658
|
What a beauty

|
|
|
|
|
8th March 2008, 02:50 PM
|
#8 |
|
Member
Join Date: Dec 2004
Posts: 1,038
|
I can see why it's one of your favorites. It's one to behold.
Is the asang-asang a replacement? To me it's a bit oversized, maybe it's the color playing tricks on my eyes. It's making it stand out. Congrats! |
|
|
|
|
8th March 2008, 03:35 PM
|
#9 |
|
Member
Join Date: Oct 2007
Posts: 1,657
|
Hi Bill,
I am interested in inlaying techniques therefore would it be possible to post a close up of the blade where the wire ends and the inlay groove is empty. Many thanks. Regards, Norman. |
|
|
|
|
8th March 2008, 03:42 PM
|
#10 |
|
Member

Join Date: Dec 2004
Location: Greenville, NC
Posts: 1,854
|
Now this is gor-geeeeez!
|
|
|
|
|
9th March 2008, 03:26 AM
|
#11 |
|
EAAF Staff
Join Date: Dec 2004
Location: Louisville, KY
Posts: 7,407
|
Impressive! Is this a former Cato piece?
Norman - if you are comming to Timonium, I will be addressing inlay in my presentation.... |
|
|
|
|
9th March 2008, 04:19 AM
|
#12 |
|
Member
Join Date: Feb 2006
Posts: 327
|
Jose: As far as i know, and i could be wrong, i don't think Bob had any twist-cores in his collection............Dave.
|
|
|
|
|
9th March 2008, 06:41 AM
|
#13 |
|
Member
Join Date: Oct 2007
Posts: 2,818
|
Thanks for the email Bill, I have done image comparisons and I must say that yours is an extraordinary example.
I am curious at to what the rest of the detail of the handle looks like? regards Gav |
|
|
|
|
9th March 2008, 01:51 PM
|
#14 | |
|
Member
Join Date: Mar 2005
Location: USA Georgia
Posts: 1,599
|
Dave,
I believe that you are right about Cato not having twistcores in his book. Don't think that my piece was in his book. Wish it was! Quote:
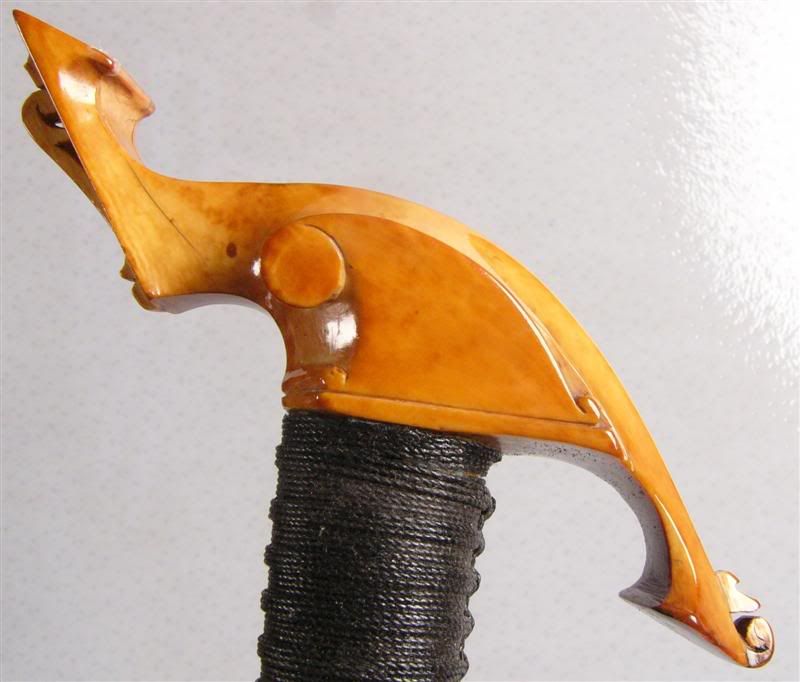 Really looks like a bird from the top. 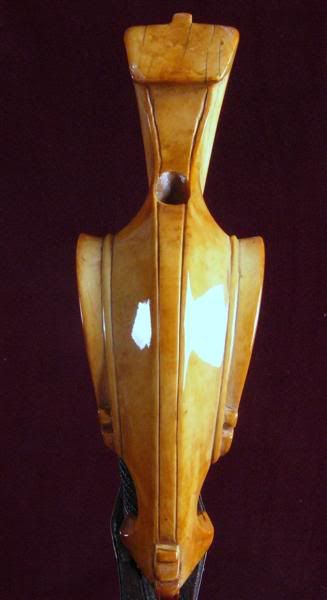
|
|
|
|
|
|
9th March 2008, 02:01 PM
|
#15 |
|
Member
Join Date: Dec 2004
Location: Sweden
Posts: 1,637
|
Nice, nice, nice
The hole looks like it's a tooth, maybe one of the seabased (but I am not good at separating different kind of ivory)? Michael |
|
|
|
|
9th March 2008, 03:34 PM
|
#16 | |
|
Member
Join Date: Mar 2005
Location: USA Georgia
Posts: 1,599
|
Quote:
Hi Michael, Though I am not good at separating kinds of ivory, I would guess that it came from a mature female African elephant. It has that grain and striations. I think that the hole is an attachment point. Most of the others I have seen had a plug here. Some are plugged across the pommel. I managed to take a picture using the fiber optic ringlight from my microscope on my camera. |
|
|
|
|
|
9th March 2008, 09:46 PM
|
#17 |
|
EAAF Staff
Join Date: Dec 2004
Location: Louisville, KY
Posts: 7,407
|
The scabbard looks like one from Cato.....
|
|
|
|
|
9th March 2008, 11:41 PM
|
#18 |
|
Member
Join Date: Oct 2007
Posts: 1,657
|
Battara, would love to hear your presentation re inlaying techniques but unfortunately I live on the other side of the Pond, Scotland to be precise, so not a simple trip. Am in the initial process of inlaying script in a blade with copper wire so was interested in seeing how different cultures approached this type of decoration technically.
Regards, Norman. |
|
|
|
|
10th March 2008, 01:46 AM
|
#19 | |
|
Member
Join Date: Mar 2005
Location: USA Georgia
Posts: 1,599
|
Quote:
Norman, I will be happy to do this. I have a microscope and will take some real closeups. I tried with the camera, but was not happy with the results. Will get some images this week. |
|
|
|
|
|
10th March 2008, 12:52 PM
|
#20 |
|
Member
Join Date: Oct 2007
Posts: 1,657
|
Hi Bill, am looking forward to your photos, many thanks for your time and effort.
Regards, Norman. |
|
|
|
|
11th March 2008, 02:56 AM
|
#21 |
|
Member
Join Date: Mar 2005
Location: USA Georgia
Posts: 1,599
|
Hi Norman,
Not being certain of what you want to see, I have posted a few macro and micro images. First the macro 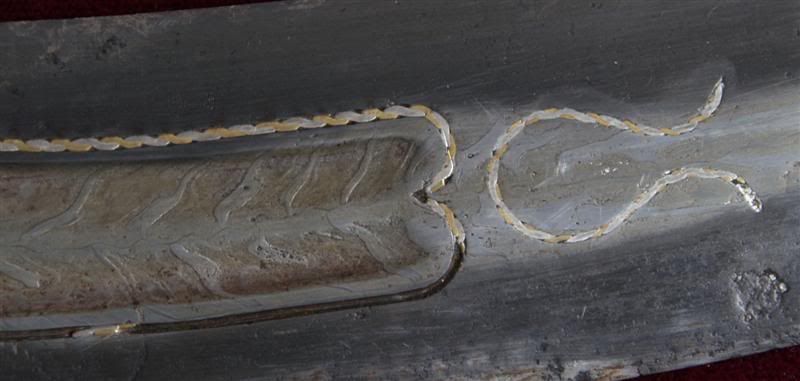 Moving in closer 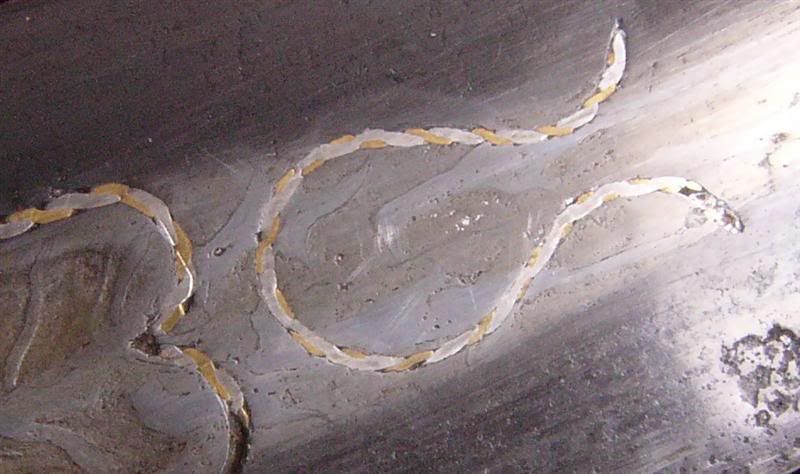 Still Closer 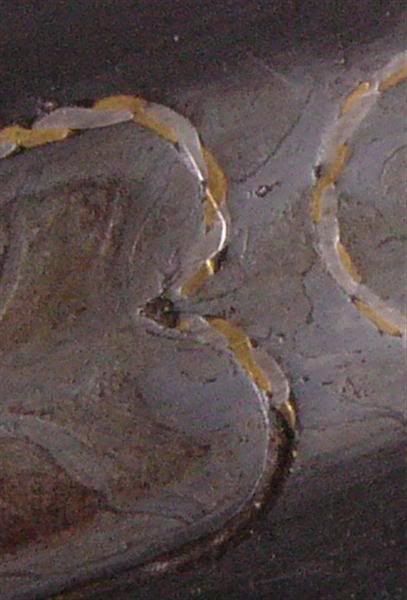 Into Micro, please excuse the color shift, I may need a different filter on my light source. Here is a 10x of the place where the two lines join at a point. 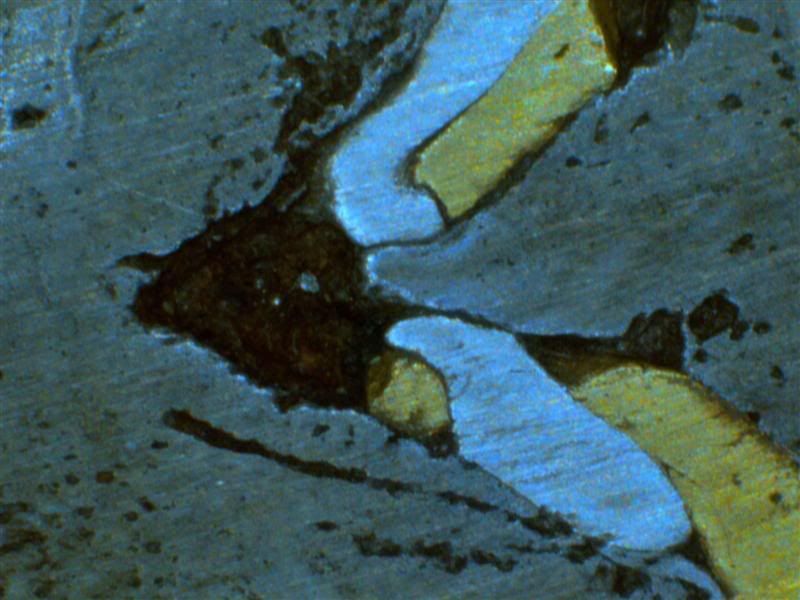 Micro of the gold and silver wire. 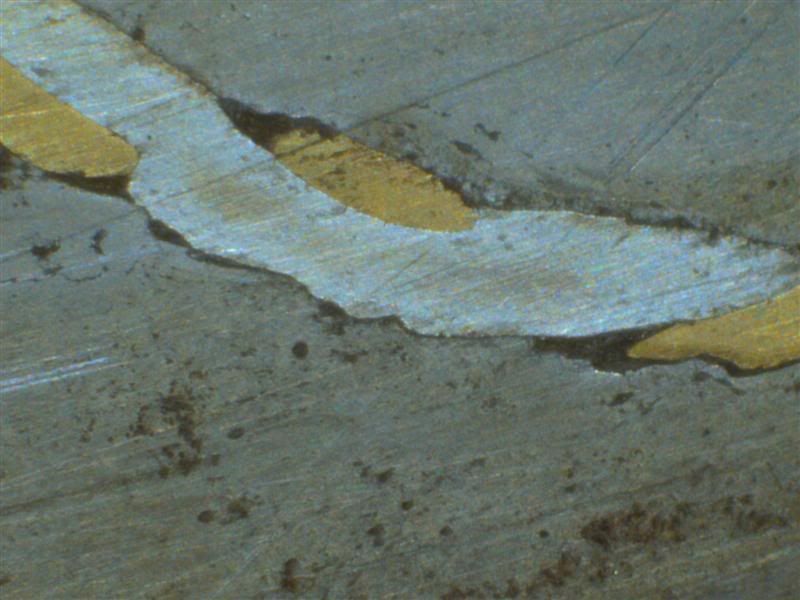 Micro where the wire has come loose showing the channel. If you want more showing the channel, I can oblige. 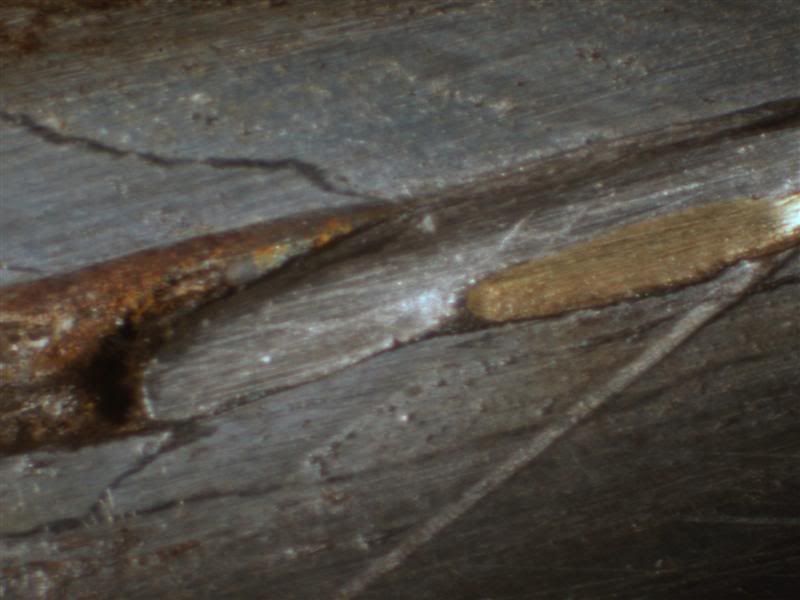 Micro of the wire. 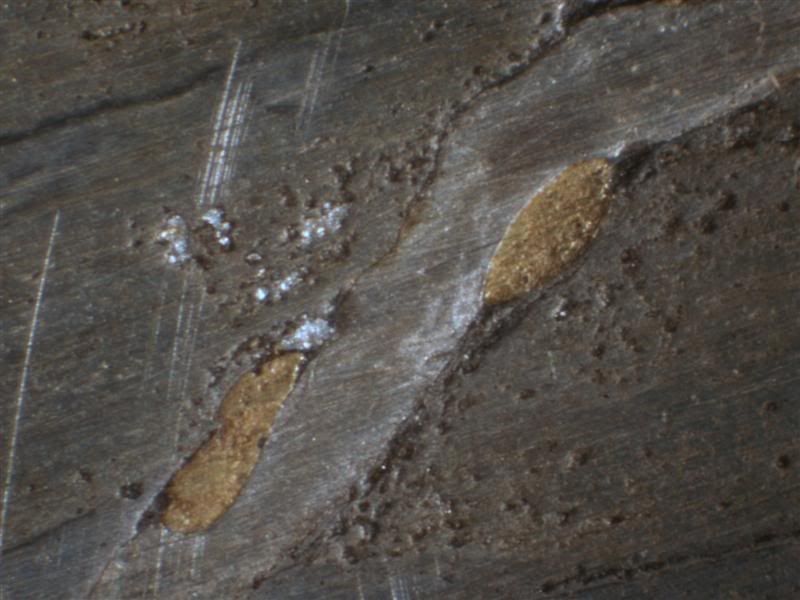
|
|
|
|
|
11th March 2008, 08:53 PM
|
#22 |
|
Member
Join Date: Oct 2007
Posts: 1,657
|
Hi Bill,
Many thanks for the photos, I've been experimenting with inlaying copper into steel and what I wanted to see was how the grooves were prepared for inlaying. On European weapons it would appear the groove is undercut using a special tool forming an inverted T so that when the inlay is forced into the space it expands into the T thereby forming an anchor for the metal inlay. From what I can see this is not the case in this blade and internal 'roughness' of the groove is sufficient to grip the inlay if it is laid in with enough force. This is how I have done it and it seems to work very well. Is there any evidence of an adhesive in the groove? I was thinking of possibly a similar substance to that used in India for Tulwar hilts. I also wanted to see how smooth the edges of the grooves were as this is a difficult thing to achieve with hand tools although only really apparent upon close inspection and not terribly noticeable at normal viewing distances. Thanks again for the pictures and would you mind if I copied them into my photo file for future reference? Regards, Norman. |
|
|
|
|
11th March 2008, 10:36 PM
|
#23 |
|
Member
Join Date: Jan 2006
Location: Kent
Posts: 2,658
|
Hi Bill,
the magnified images are really interesting There seems to be crystaline 'structures' (ringed in photo) in the blade .... any idea what they could be David . |
|
|
|
|
12th March 2008, 12:10 AM
|
#24 | ||
|
Member
Join Date: Mar 2005
Location: USA Georgia
Posts: 1,599
|
Quote:
I will look deeper with higher magnification. and try some different angles. Quote:
Norman, you are perfectly welcome to use the images anyt way you like! I want to try some more images at different angles and using fiberoptic ringlight as well as the dual goosenecks. I don't think there is an inverted "T." It looks like it is mainly just a groove with the metal pounded in as you suggested. Bill |
||
|
|
|
|
15th March 2008, 06:09 PM
|
#25 |
|
Member
Join Date: Dec 2004
Posts: 1,038
|
[QUOTE=Bill MarshIvory Kakatua / jungayyan pommel has a honey color. Very unusual to find these rare delicate pommels undamaged.
QUOTE] Undamaged ones are really hard to find. They do look delicate and vulnerable to the elements, susceptible to chipping and breaking just by handling. DaveS., has several that he takes to events and lets the public handle them. You're a brave man Dave. |
|
|
|
|
15th March 2008, 08:39 PM
|
#26 |
|
Member
Join Date: Mar 2005
Location: USA Georgia
Posts: 1,599
|
I have personally seen DaveS pieces, but they were mounted in a shadowbox with a glass front. DaveS and LonnaS have one of the most awesome collections I have ever handled --- about two years ago. Probably is even better, now!
I cringe when my friends want to handle my pieces, particularly these barongs. The first one has the lower end broken off and smoothed (I think) I may make some shadowboxes also! |
|
|
|
|
16th March 2008, 02:36 AM
|
#27 |
|
Member
Join Date: Feb 2006
Posts: 327
|
Bill: That has to be one of the prettist pieces of ivory i've seen. Basically the same style that one usually sees of this type, but it's the color that makes this one especially good. I've been told that color is just due to normal ageing of the ivory, but we have many old ones that are basically white with just a little bit of color. So who knows. Maybe someone on the forum knows the reason why some hilts turn this color and why some don't
Albert: I guess over the years Lonna and I have been lucky that none of our pieces have ever been dropped. It could be that people are forewarned that in no uncertain terms that they can handle most anything they want, but "you breakee, you fixee", and it will cost you a lot money. The only pieces that have ever been broken have been from my own clumsyness......ooops!!!!!!!!. Can't wait to see your new pieces at the Oregon Knife Show this year.............Dave. |
|
|
|
|
17th March 2008, 10:39 PM
|
#28 | |
|
EAAF Staff
Join Date: Dec 2004
Location: Louisville, KY
Posts: 7,407
|
Quote:
Hope this helps. |
|
|
|
|
|
19th March 2008, 07:09 PM
|
#29 |
|
(deceased)
Join Date: Dec 2004
Location: OKLAHOMA, USA
Posts: 3,138
|
VERY INTERESTING CLOSE UPS OF THE INLAY TECKNIQUE IT KIND OF REMINDS ME OF THE TWISTED WIRE INLAY ON THE MOROCCAN WEDDING NIMCHA BLADES. I HAD NOT SEEN THAT TECKNIQUE USED ON MORO WEAPONS BEFORE
ANOTHER FACTOR CAUSING IVORY TO TURN COLORS IS CONTACT WITH HUMAN SKIN, THE OILS. ACIDS AND WHATEVER ELSE FOUND IN THE ENVIRONMENT CAN OVER TIME CAUSE A VERY ORANGE COLOR. AFRICAN IVORY BRACELETS ARE A GOOD EXAMPLE ,SOME MORO WEAPONS WITH A MORE SIMPLE IVORY HANDLE ALSO HAVE A GOOD RICH PATINA. I SUSPECT THE REASON FOR LESS PATINA ON THE VERY FANCY DELICATE IVORY POMMELS IS THAT THEY WERE NOT WORN EVERYDAY AND WERE HANDLED VERY CAREFULLY BY THE GRIPS ONLY TO HAVE SURVIVED INTACT ALL THESE YEARS. VERY BEAUTIFUL EXAMPLES ALL , TIME TO MOP THE DROOL OF MY KEYBOARD
|
|
|
|
|
19th March 2008, 08:54 PM
|
#30 |
|
Member
Join Date: Mar 2005
Location: USA Georgia
Posts: 1,599
|
Thanks for the compliments, all. Especially DaveS, who has one of the finest collections I have ever seen, including some really awesome jungayyan kris!
I hunted a long time to find a good ivory jungayyan kris. Finally I have all three; kris, barong and kampilan with ivory. I am a happy camper! |
|
|
|
|
|
|


 Linear Mode

