
|
 1st September 2008, 02:04 PM
|
#1 |
|
Member
Join Date: Dec 2004
Location: What is still UK
Posts: 5,755
|
Having problems with pic uploading. Sorry no before pics. More latter.
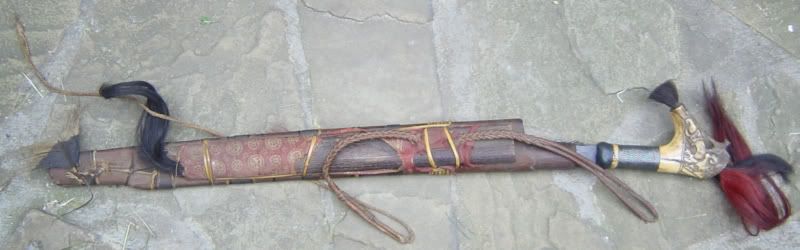  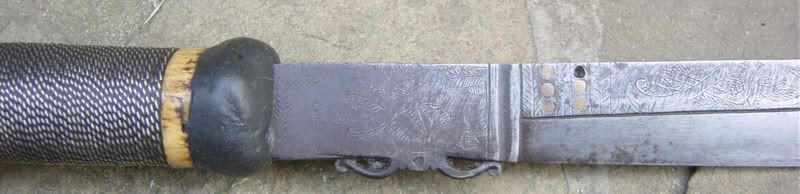 Note old repair to scabbard mouth. 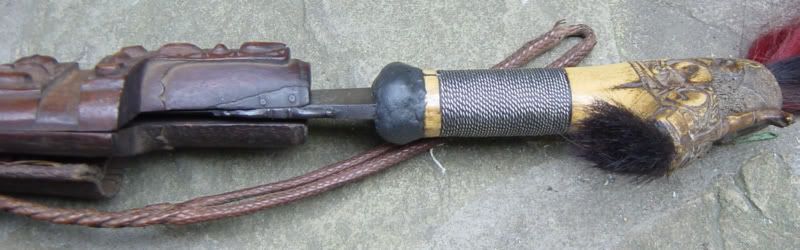  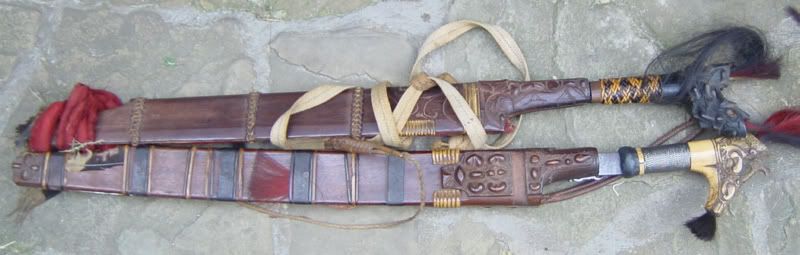 This is my brother inlaws PC and I cannot get the manage attachments to work? 
Last edited by Tim Simmons; 1st September 2008 at 02:33 PM. |

|

|
|
1st September 2008, 08:58 PM
|
#2 |
|
Member
Join Date: Dec 2004
Location: What is still UK
Posts: 5,755
|
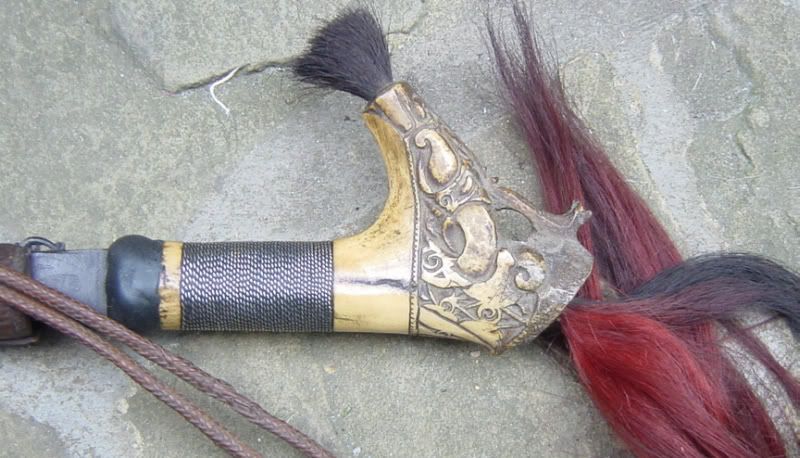
I like this handle a little more.
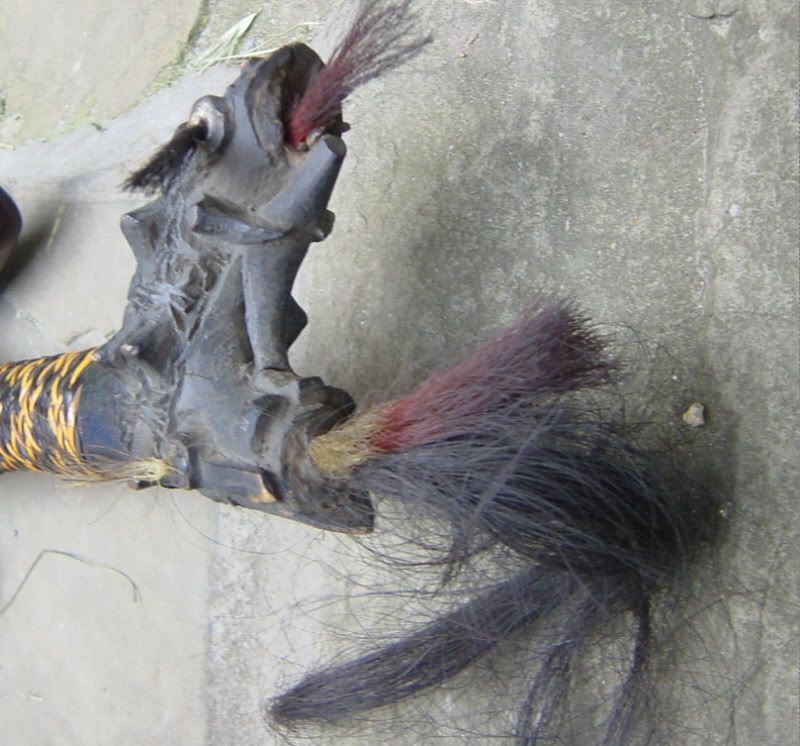    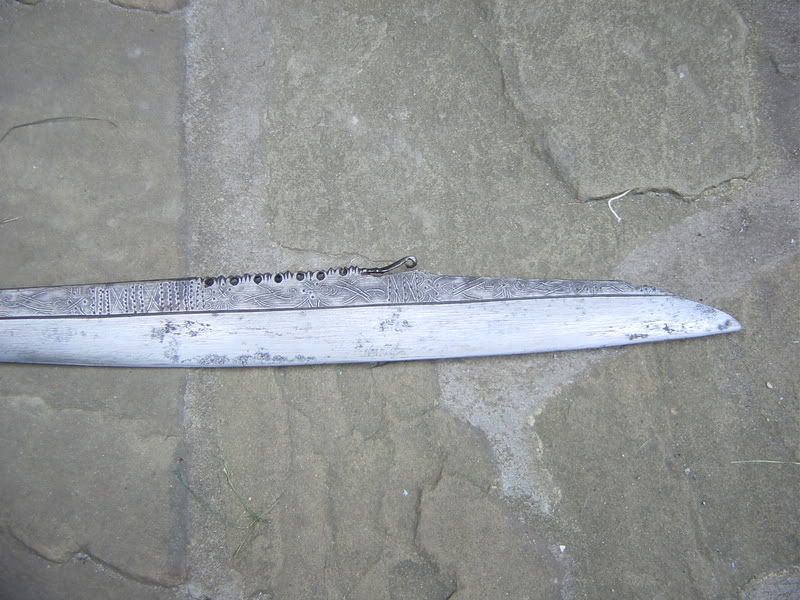 I also like the more tatoo like engraving on this blade? Last edited by Tim Simmons; 1st September 2008 at 09:09 PM. |
|
|
|
|
2nd September 2008, 12:38 AM
|
#3 |
|
(deceased)
Join Date: Dec 2004
Location: East Coast USA
Posts: 3,191
|
Tim
Very nice job! Lew |
|
|
|
|
2nd September 2008, 02:52 AM
|
#4 |
|
EAAF Staff
Join Date: Dec 2004
Location: Louisville, KY
Posts: 7,170
|
What a nice puppy and nice work too.
|
|
|
|
|
2nd September 2008, 09:59 AM
|
#5 |
|
Member
Join Date: Dec 2004
Location: Sweden
Posts: 1,637
|
I like both.
But please exlain how they have been restored? Michael |
|
|
|
|
2nd September 2008, 11:46 PM
|
#6 |
|
Member
Join Date: Nov 2006
Location: The Netherlands
Posts: 2,221
|
I believe it is the silver wire and the resin ring at the base of the handle.
http://www.vikingsword.com/vb/showthread.php?t=6840 But my first thoughts indeed where : what restoration  So, nice job done 
|
|
|
|
|
3rd September 2008, 02:21 AM
|
#7 |
|
Keris forum moderator
Join Date: Aug 2006
Location: Nova Scotia
Posts: 7,061
|
Tim, can you talk a bit about your methods with this restoration. I need to do something very similar (wire and resin). I am most curious about how you both start and terminate the wire so no ends show and what you used to repair/replace the black resin. Also what gauge and type of silver wire did you use? Nice job.
|
|
|
|
|
3rd September 2008, 01:33 PM
|
#8 |
|
Member
Join Date: Dec 2004
Location: The Netherlands
Posts: 1,209
|
Yes Tim, do us a favour. Give us the details of this wonderful job.
|
|
|
|
|
3rd September 2008, 02:44 PM
|
#9 |
|
Member
Join Date: Dec 2004
Location: What is still UK
Posts: 5,755
|
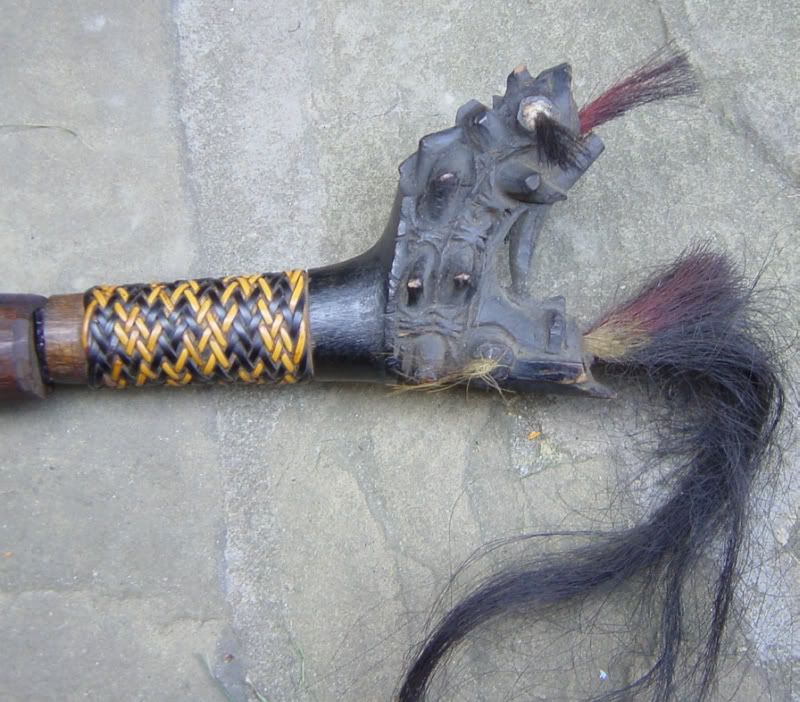
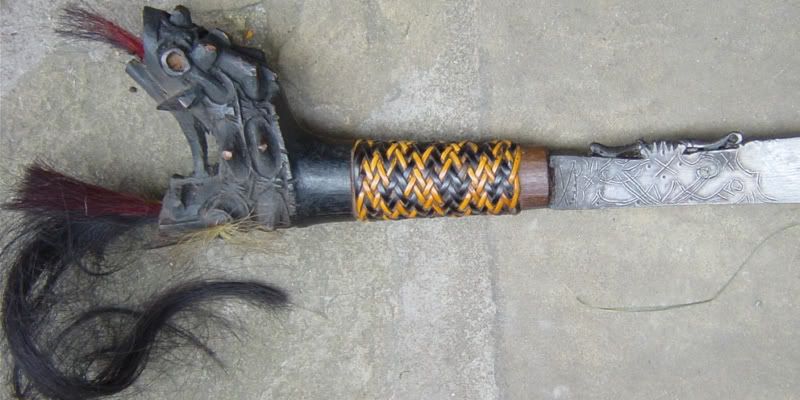
First the handle had lost all its original resin and had about six wraps of two piece twisted brass wire left on. There was a crack from near the centre of the handle running out to the blade. This crack had been recently made by somebody trying to sure up the remaining wire. The antler cracked because a hole had been drilled using a power tool.
If you do not have old fine holes in the handle then I suggest it was originally woven rattan or wire rather than wrapped, in weaving the ends can be held by the weave itself. My piece had two old holes, one at the far end and one near the middle, perhaps originally wrapped in sections? the hole at the other far end must have become part of the crack. So the big NO NO !!!!!! is using the pillar drill in the garage or DIY drill or hobby craft drill, they will not take a fine enough drill and the pressure will crack the antler. As these are your treasures use a finger drill one you twiddle also you will need to get the small bit from a jewelery tool supplier. You could twiddle a very fine round needle file but that would come from the same place. You need more wire than you think. I used 40ft but have about 4ft of twisted wire left, who wants to not complete the job!!! I chose the same gauge 0.5mm as that left of the original. I used silver because I could get it over night from my supplier. If you use brass you have to be sure it is the right type of soft brass {alloy} as most brass will work harded and will snap as you twist unless you keep annealing as you go. This is not easy with 40ft of wire and avoiding tangles but could be done in a cooking pot with a blow torch. To twist. From now on it is good if you have four hands, keeping two hands at the ready. Get yourself a spindle about 30cm long. Knot the two ends of the wire, hook it to the wall or a tree?? Divide the wire with the spindle, try to sort the wire under very gentle light tension. You will have to go with the twist the wire wants to form. Start twisting. It is in the first 15cm of wire from your spindle where the desired tightness of twist will develope, the tighter twist the nearer the spindle. As you arrive at the twist you desire wrap it around your spindle working towards where you anchored the other end. Do not make it too tight or uneven. Too tight you risk snapping also work hardening which will make wrapping hard unless you anneal the wire before wrapping. You should feel whats right as you do it. It is not difficult, just slow calm ,it will take a couple of hours. Wire ready? Part 2 The resin. This is "shelac" the beauty here is that it is the same material used originally and does not age. 100 year old shelac will look the same as new shelac. So there is no fakery it is not even restoration all you are doing is a repeat of the original work which may have needed doing again in the past for all you know. Shelac in a solid stick form can be bought from fine furniture retoration supply people or jewelery supply people. There is natural colour varriations usually browns. I added powdered charcoal as this makes it less brittle and a slightly thicker paste to work with. I added this while heating the shelac bit by bit untill I felt a spreadable paste. I used my spirit lamp I use when working with wax. I think it would be best and more easy to use the fading heat of an instant BBQ for safty and giving you more time keeping your mixture molten. Use a spreader to apply your mixture. It will burn you and I am sure you will burn your fingers but the results are worth it. There are a few moments while cooling that it is okay to model and smooth with your fingers. It can be smoothed with very gentle heat but care must to taken not to burn hair tassles or surounding parts. Wrapping is really quite simple. Insert one end of the wire in the hole at the edge of section carved to take the wire wrap. bend it over and start wrapping tightly. There should be enough tension in the wire to hold to the handle. To aid this I used a brown sculpting wax which can be made soft and sticky when worked in the hand. A bit like the red wax edam chease is coverd in but you would not want to use red wax. Keep wrapping untill you reach the hole at the other end. You need about 5mm more wire past the hole. Keep the wrap tight bend the wire over and insert it into the hole you may need pliers and a light pin hammer. I managed this without resort to glue  as did the original sword fitters so should you. Clean off the excess wax that has been forced to the surface and it is done. On my Mandau handle there is a carved step down section at the blade end with fish scale like cuts that I assume were cut for the shelac to grip to. Do the thing with the shelac heat and spreader then it should be all over. I rubbed the wire section down with charcaol dust and oxidised the silver with a oxidising solution. You can make a solution using rock sulpher you get from pet shops. as did the original sword fitters so should you. Clean off the excess wax that has been forced to the surface and it is done. On my Mandau handle there is a carved step down section at the blade end with fish scale like cuts that I assume were cut for the shelac to grip to. Do the thing with the shelac heat and spreader then it should be all over. I rubbed the wire section down with charcaol dust and oxidised the silver with a oxidising solution. You can make a solution using rock sulpher you get from pet shops.All work is completely reversable. What you can still see of the crack is quite acceptable no worse that many Mandau one sees. Pics of tools and work. 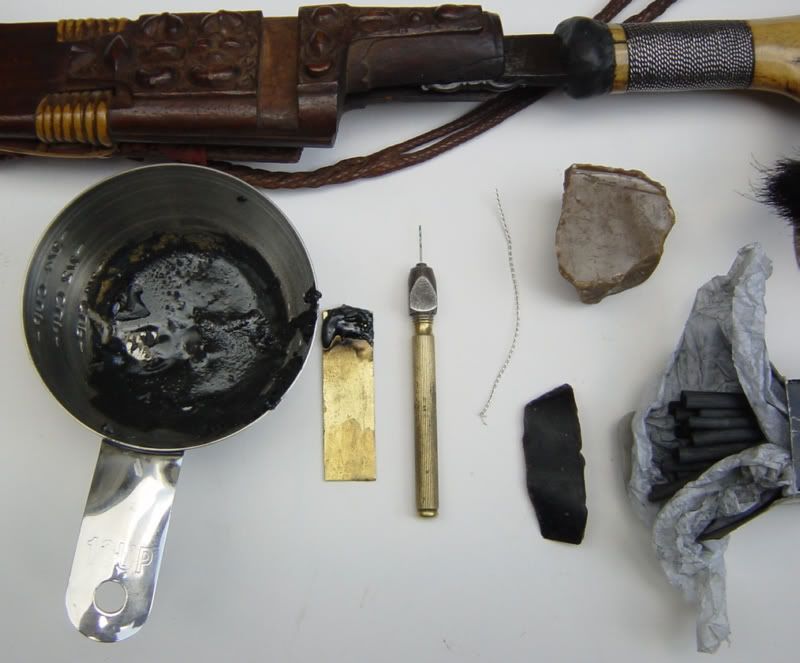
Last edited by Tim Simmons; 3rd September 2008 at 05:55 PM. |
|
|
|
|
3rd September 2008, 08:31 PM
|
#10 |
|
Keris forum moderator
Join Date: Aug 2006
Location: Nova Scotia
Posts: 7,061
|
Thanks Tim, that was very helpful.
|
|
|
|
|
3rd September 2008, 11:18 PM
|
#11 |
|
Member
Join Date: May 2006
Posts: 6,781
|
Tim, I think you will find that the resin at the base of these mandau handles is damar, not shellac. Damar is a natural resin, and is mixed with wax to assist pliability.Shellac, even when mixed with other agents, lacks the strength for use. It will look similar, but it is not as strong as damar.
|
|
|
|
|
4th September 2008, 07:02 AM
|
#12 |
|
Member
Join Date: Dec 2004
Location: What is still UK
Posts: 5,755
|
Well it is still a natural Asian substance and it feels jolly hard to me
.http://en.wikipedia.org/wiki/Shellac Last edited by Tim Simmons; 4th September 2008 at 08:03 PM. |
|
|
|
|
4th September 2008, 11:03 PM
|
#13 |
|
Member
Join Date: May 2006
Posts: 6,781
|
Yes, of course it is.In fact I have lifelong experience with shellac. My father was fine art cabinet maker, and as a little kid one of the jobs I used to get given was using button shellac to fill tiny imperfections in cabinet work. You melt the shellac over a candle, smear it into the hole, and then the surface gets refinished.
Button shellac is probably the most favoured traditional adhesive for use on Javanese wrongkos, however, it is not a very strong adhesive, and only works well when the gandar is supported by a pendok. Shellac is sometimes used in recent times as a filler for silver handles in Indonesia, but its not very durable, and over time it will crack, and you can hear the pieces rattling around inside the handle. The traditional filler for sword and dagger handles was damar mixed with beeswax and a solid filling agent. This stuff sets like rock and will never crack, but a handle can be fairly easily removed from a blade simply by heating the blade. In all the mandau that I have had to restore, the lump on the bottom of mandau handle has displayed the properties of damar + beeswax, and sometimes with a filler, like the Javanese handle filler. When I have had to replace this lump, I've always used damar + beeswax + plus a terracotta filler. I don't know the tree that damar comes from, but when you melt it, it has a very strong pine-like smell, and is very flammable, in fact, its pretty dangerous stuff to use.If you get a drop on your skin it just sticks and burns right through. Pretty painful. http://www.rfpaints.com/PUWin/Damar.htm |
|
|
|
|
5th September 2008, 01:11 AM
|
#14 | |
|
Keris forum moderator
Join Date: Aug 2006
Location: Nova Scotia
Posts: 7,061
|
Quote:
|
|
|
|
|
|
5th September 2008, 02:00 AM
|
#15 |
|
Member
Join Date: May 2006
Posts: 6,781
|
David, I don't want to be a miserable old so & so, but I'm sorry, I cannot. In fact, I've probably already said too much. This was given to me by the grandson of one of the old-time , great, mranggis, and along with the qualification:- "this is enough for Pak Alan alone". In other words, keep your mouth shut. This man is still alive, so out of respect for him, I've said as much as I intend to.
If you wanted to try it, just play around a bit with proportions, and use common sense. But it is dangerous stuff, it throws off clouds of very inflammable smoke when you make it, and if it catches fire its best just to run and let it burn itself out. Goes without saying you do it outside away from any buildings. |
|
|
|
 |
|
|


 Linear Mode

